Macros


|
Macros |
|
|
Menu: Tools > Macros
Default Shortcut Key: F8
Macro function: none
Boxer includes a powerful macro language than can be used to automate repetitive editing tasks, or to perform specialized processing on the text files you edit. Macros can be created in one of two ways: Macros can be recorded 'by example' by typing commands and/or insertable text within the macro dialog. When this is done, the macro code is written automatically, on-the-fly, in the editor window of the macro dialog. For more complex macros, the edit window can be used to write a macro by hand, or to make refinements to a macro that was recorded by example.
Boxer's macro language is similar in style to the C programming language, and will be quickly understood by anyone who has programmed in a high-level language, or in other macro/scripting languages. The macro dialog contains built-in lists of all the language's keywords, functions and operators, along with instant help information for each entry (see screen shots below). Boxer has been supplied with numerous example macros which are meant to illustrate the use of the language, as well as to provide genuinely useful services. For example, the ExampleApplyHTML macro will apply the necessary HTML declarations to make a simple text file into an HTML document.
Some people will want to dive right in, so here's a quick example:
Simple Macro Example, Step One You've got a file that needs some repetitive editing. You need to delete the first four characters from the start of every third line. The file to be processed is open for editing, and the text cursor is sitting on the first line that needs adjustment. Here's how to create a macro to perform the editing required:
Issue the Tools|Macros command from the Main Menu Click New Press the Delete key four times Press the Down Arrow key three times Click Save Enter a name for the macro Click Run, as required
The resulting macro looks like this:
macro newmacro() { Delete; Delete; Delete; Delete; Down; Down; Down; }
Simple Macro Example, Step Two That's great, you say, but maybe your file is 300 lines long. Or 30,000 lines long. How can we make this macro work on the whole file?
In Step One, the macro was written for you automatically, as you typed the editing commands. To handle a file of arbitrary length, we'll need to add a little code. Edit your macro to look like this:
macro newmacro() { int i;
for (i = 1; i <= LineCount(); i += 3) { Delete; Delete; Delete; Delete; Down; Down; Down; } }
Click Save, and then Run. This macro loops through the file, counting by three, performing the necessary adjustments. Because it calls the function LineCount(), it will work for a file of any size.
See the following help topics for additional information about macros: Macro Language Reference, Macro Function Reference and Macro Examples.
The sections below cover the Macro Dialog in further detail...
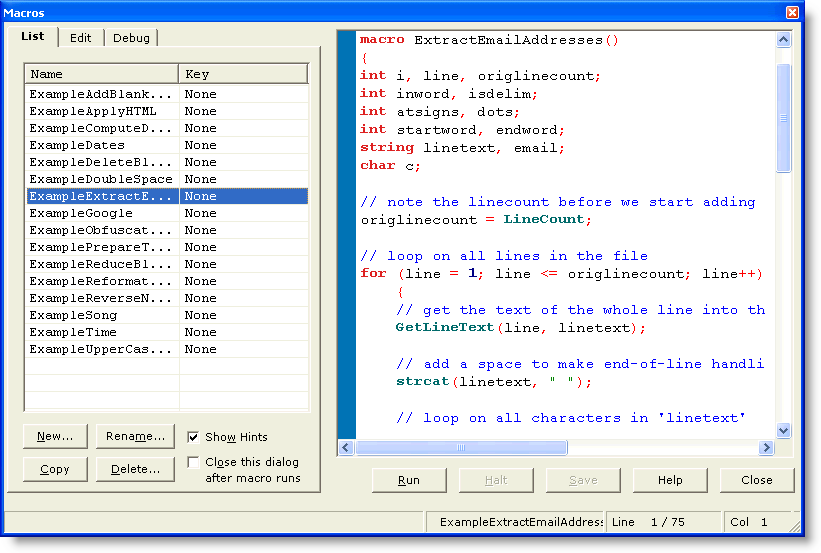
List Tab New Use the New button to start a new macro. A new macro is created and control will switch to the Edit Tab. You will be able to name the macro later when you select the Save option.
Copy The Copy button will create a copy of the selected macro. You can then use the Rename button to rename the copy, if desired.
Rename Use the Rename button to rename the selected macro.
Delete Use the Delete button to delete the selected macro. A confirmation prompt will be supplied before the macro is deleted.
Edit Tab The Edit Tab contains controls that can be used when composing a macro. If the macro is to be recorded 'by example', simply type the desired keys in the edit box at the top of the panel. You'll notice that the code of the macro is written automatically, as you type, in the editor window at the right. Feel free to switch to the edit window if changes are needed to the macro code. You can resume recording 'by example' at any time by positioning the text cursor in the editor window and returning focus to the edit box at the top left.
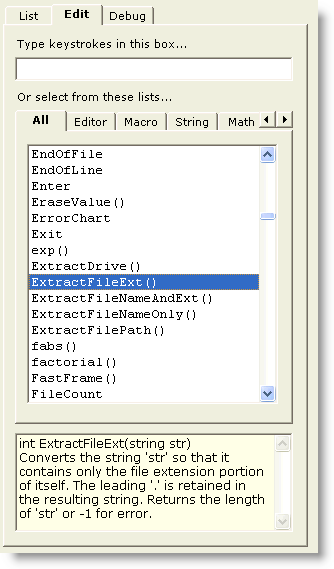
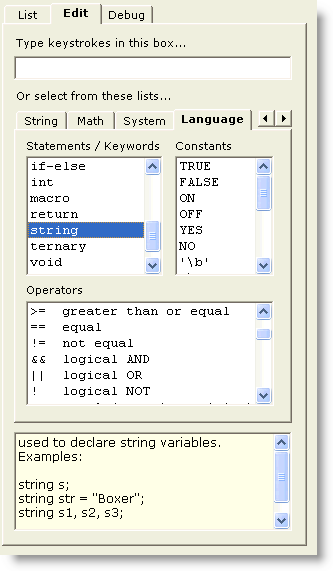
When composing a macro by hand, the lists on the Edit Tab will prove useful for recalling the macro language function names, keywords, and operators. Each time an entry is selected in a list, the help window at the bottom of the panel displays relevant information about the selected entry. You can insert the selected entry into the editor window by pressing Enter or by double-clicking.
The All tab contains a list of all functions that are available in the macro language, regardless of their logical category. The Editor, Macro, String and Math tabs display function lists for each of those respective categories. Editor contains functions that map to commands available within the editor proper. Macro contains functions that are unique to the macro language. String contains functions that can be used to manipulate strings. Math contains functions that support mathematical operations. The Language Tab contains lists of statements, keywords, constants and operators.
The editor window is used to edit the macro being composed. The macro is displayed with color syntax highlighting, just as if it were being edited in the editor proper. Although the macro editor window looks like a normal Boxer editing window, it is not. You will find that the standard editing and cursor movement commands are available within this window, but Boxer's advanced editing commands are not. If you are composing a complex macro, you might prefer to edit your macro within a normal editing window. For this reason, the editor offers an Open in Boxer command on its context menu.
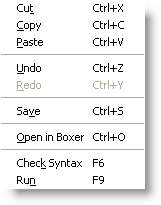
Additional editor functionality is available on the context menu by right clicking in the editor window when the Edit Tab is active.
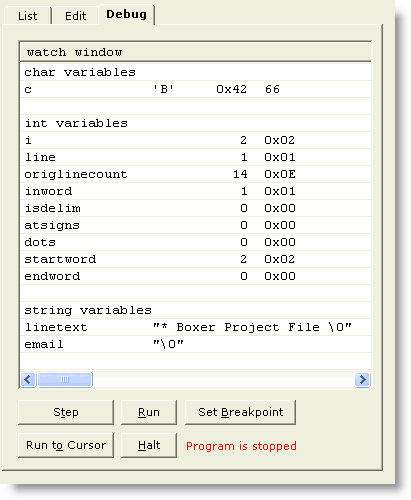
Debug Tab The Debug Tab contains Boxer's integrated macro debugger. The debugger can be used to control the execution of a macro and view a macro's variables as the macro is executed. The Watch Window shows a macro's variables, arranged by type, in both decimal and hexadecimal format. As the macro is executed, the Watch Window updates to show the current value of each variable. Note that there is no need to designate a variable as a watch variable; all variables are automatically added to the Watch Window each time the macro is debugged.
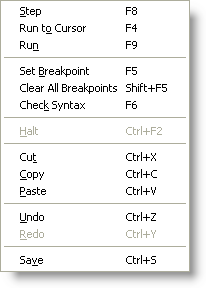
To begin debugging a macro, click the Step button. The Step button is used to execute a single line of code. You can click Step repeatedly to walk through the macro, line by line. To jump ahead in the macro, position the cursor in the editor window on the line of interest and click the Run to Cursor button. Execution will continue until the desired line is reached. The Run to Cursor button can be thought of as a one-time breakpoint. To ensure that execution will stop on a selected line every time, use the Set Breakpoint button. The line of interest will be highlighted in the editor window with a 'B'. To run the macro without single-stepping, click the Run button. Run causes the macro to run without interruption, until a breakpoint is hit. If no breakpoints are encountered, the macro will run to completion. Use the Halt button to terminate the execution of a macro.
Additional debugger functionality is available on the context menu by right clicking in the editor window when the Debug tab is active (see context menu above).
Assigning a Macro to a Key Sequence There is theoretically no limit to the number of macros that can be created. All of the macros in Boxer's 'Macros' directory will be displayed in the macro list that appears on the List tab, and these macros can be run by clicking the nearby Run button. In addition, up to 50 macros will be displayed on the Tools | Run Macro submenu, and these macros can be executed directly from that menu. When more than 50 macros are present, those which sort lowest alphabetically will be the first to be omitted from the Run Macro submenu. If you want to force a certain macro to appear in the menu, you can do so by changing its filename to one that will rank higher in an alphabetic sort.
You may wish to assign commonly used macros to a key assignment to make them easier to execute. There are 50 editor commands available for this use, named Run Macro 1 to Run Macro 50. These commands appear in the command list on the Configure | Keyboard dialog. In order to make a macro eligible for key assignment, its filename must end with a value from 1 to 50. For example, if you name a macro ProcessPayroll24.bm, that macro can later be run by the key sequence that has been assigned to the Run Macro 24 command.
Initially, the 50 Run Macro N commands are unassigned. Assigning a macro to a given key sequence is thus a two-step process:
1. Make sure that the filename of the macro ends with a value in the range 1-50, and does not conflict with other numbered macros.
2. Use the Configure | Keyboard dialog to assign a key sequence to the corresponding Run Macro N command.
Running a Macro from the Command Line A macro file can be run by naming it on the command line using the -M command line option flag. Please see the notes in that section for full details on this capability.
Running a Macro Automatically on Startup There may be times when you want Boxer to perform a series of commands--or react to one or more configuration changes--every time the editor is launched. If a macro of the name startup.bm is found in the macros directory, it will be run automatically on startup.
Running a Series of Macros in Batch Mode For some editing tasks it may be desirable to develop a series of macros to perform the necessary conversions. This approach may be desirable when the overall conversion is too complex to implement in a single macro, or when some steps of the conversion will need to be applied selectively on a case-by-case basis. If you have developed a set of macros, say step1.bm, step2.bm and step3.bm, these macros can be run in series from a macro batch file -- which might be named do_it_all.bm -- and which names these files in succession:
step1.bm step2.bm step3.bm
Blank lines may appear within a macro batch file, but all other lines must contain the name of an existing macro file which is to be run.
Storing Macro Variables From Run to Run After a macro has completed, its variables are no longer available for study or use. Two macro functions can be used to store and recall macro variables so that they can be used again at a later time:
int WriteValue(string name, char/int/string/float val) 'name' will be visible to other macros, so be careful to choose a unique identifier. Returns 1 for success or -1 for error. See also ReadValue(), EraseValue().
int ReadValue(string name, char/int/string/float val) and places it into variable 'val'. The type of 'val' must agree with the type used when the value was written using WriteValue(). Returns 1 for success or -1 for error. See also WriteValue(), EraseValue().
|