Configure Toolbar


|
Configure Toolbar |
|
|
Menu: Configure > Toolbar
Default Shortcut Key: none
Macro function: ConfigureToolbar()
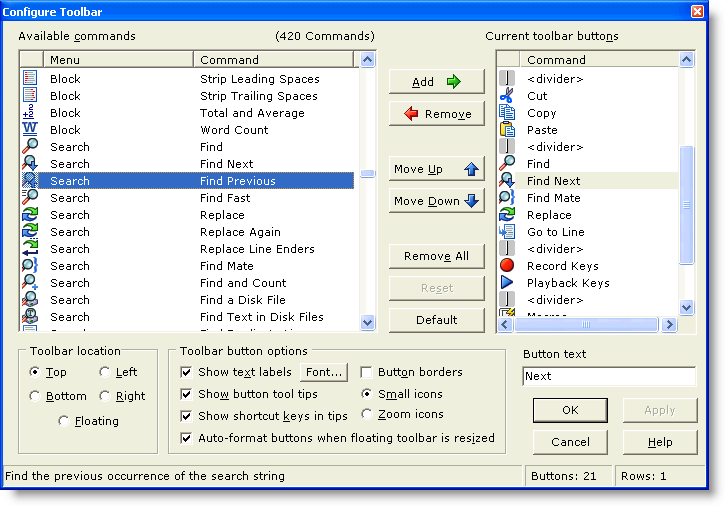
The Configure Toolbar command can be used to add or delete buttons from the toolbar, and to change the relative position of those buttons. Options are also available to control the location of the toolbar, whether the buttons are to have text labels, and several other features related to the toolbar.
Available commands The Available commands listbox contains entries for all editor commands that are not currently represented on the toolbar. The commands are initially presented in menu-order, but can be sorted alphabetically by clicking on the Command header at the top of the list. Click on the Menu header to return the list to menu-order presentation.
To add a new command to the toolbar, select the command in the Available commands listbox and click the Add button.
In addition to editor commands, several special entries can be used to control the appearance of the toolbar. The half space and full space entries can be used to insert extra spacing between toolbar buttons. The divider entry can be used to insert a visible divider. The new row entry can be placed on the toolbar to create an additional row. All toolbar buttons situated below a new row entry will appear on a new row of the toolbar.
Current toolbar buttons The Current toolbar buttons listbox contains entries for all of the buttons that are currently on the toolbar. The order of the list controls the order the buttons will appear on the toolbar. Use the Move Up and Move Down buttons to move a selected button within the list. To remove a button from the toolbar, select the button and click the Remove button.
Toolbar location Use the Top, Left, Bottom, Right and Floating radiobuttons to control the location of the toolbar. The location can be easily changed later on by right-clicking on the toolbar, or by dragging it from its current location.
Toolbar button options Show text labels Use this option to control whether or not text labels will appear below each toolbar button.
Show button tool tips Use this option to control whether or not tool tips will be displayed when the mouse is allowed to hover atop a toolbar button.
Display shortcut keys in tips Use this option to control whether or not a shortcut key will appear within toolbar button tool tips.
Auto-format buttons when floating toolbar is resized Use this option to control the formatting of the toolbar when it is displayed in floating mode. If auto-format is selected, the toolbar will ignore any new row entries within the toolbar and format itself to fill the size of the toolbar. If auto-format is not selected, a floating toolbar will wrap to a new row only when a new row entry occurs.
Button borders Use this option to place a visible border around each toolbar button.
Small icons / Zoom icons Use these options to control the size of the icon displayed on the toolbar button. Zoom icons may be useful to visually impaired users, or to those users running their monitor at very high resolution.
Button text This edit box provides control over the text that will appear below a toolbar button, when that option has been selected. By default, the full name of the command will be used, but this can be changed if desired.
|