Configure Colors


|
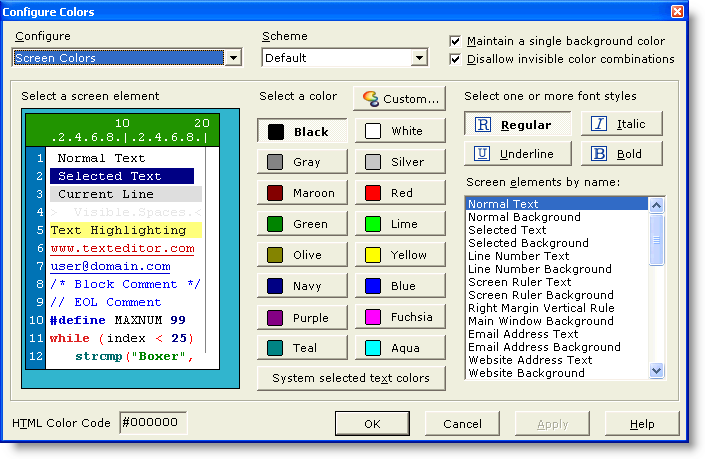
Configure Colors |
|
|
Menu: Configure > Colors
Default Shortcut Key: none
Macro function: ConfigureColors()
The Configure Colors command allows you to customize the colors that are used to display and print text files. Buttons are provided for the standard 16 colors. Use the Custom button to select from a palette of 16 million colors.
Configure The Configure Colors dialog box operates in three different modes: Screen Colors, Color Syntax Printing, and Monochrome Syntax Printing. The active mode is selected from the Configure drop-down list at the upper left of the dialog box. Screen Colors mode allows you to set the colors used to display text files on-screen. Color Syntax Printing mode is used to set the colors used for printing program files on color printers. Monochrome Syntax Printing mode is used to set the colors used for printing program files on non-color printers.
Scheme A set of pre-defined color schemes has been provided to speed the process of color configuration. You can start with the pre-defined scheme that is closest to your liking, and then make other changes as desired. Once a change has been made to a pre-defined color scheme you will be asked where to save the custom layout; four custom positions are available.
Maintain a single background color This option can be used to ensure that all elements will use a single background color. When selected, Boxer ensures that all elements are updated when the background color is changed. Turn this option off if you would like to create a color scheme in which some elements use different background colors.
Disallow invisible color combinations This option can be used to prevent any color selection which would cause the foreground and background colors of one or more elements to be the same.
System selected text colors This button can be used to quickly apply the default text selection colors of the operating system to the current color scheme.
HTML Color Code As a convenience, the current color is displayed in HTML Color Code format to make it easy to duplicate a color used in Boxer in your HTML code. The HTML Color Chart command can also be used for selecting colors and getting an HTML Color Code value.
The process of changing colors is quite simple, and includes three steps:
1. Click to select an element Click with the left mouse button in the miniature screen display on the element which is to be changed. You can click on the text of an element to select its foreground element, or on the background of an element to select its background element. After clicking, you'll see that the Elements by name listbox is updated to reflect the selected element. You'll also see that the color and font style buttons will be displayed in a depressed state to reflect the current settings for the selected element. If the element uses a color other than those appearing on the standard buttons, the Custom button will appear depressed. Some elements, such as the Right Margin Vertical Rule, cannot be easily selected by mouse in the miniature screen display. These elements can be selected from the Elements by name listbox instead.
2. Click to select a color Click on the new color for the selected element. The miniature screen display will be updated to reflect the new color. When configuring for Monochrome Syntax Printing, the available colors will be reduced to those which can be achieved on non-color printers.
3. Click to select font style(s) Click on one or more font styles for the selected element. The miniature screen display will be updated to reflect the new style. To remove a font style, click again on its button to clear the style.
|